Tuesday, April 30, 2013

Crochet Hooks from Polka Dot Cottage

A few weeks ago, I began to see an ad on the bottom of Ravelry for Polka Dot Cottage.  So I clicked on it and got lost in Lisa's world of crocheting.  What a cool blog and store!  So I splurged and ordered myself some custom made crochet hooks in the sizes that I use most for amigurumi (E, G and H).  After anxiously waiting, they finally arrived today.  Here they are:
 
 
Aren't they very pretty??!!  I love the granny square pattern so much!  I am very happy how they came out!  I chose Boye crochet hooks with thumb rests.  I have been using my "naked" Boye hook lately and it will feel so much better with a polymer clay handle.  I used it for over 2 hours last night without a problem.  It is nice to hold and it is super smooth!  I love crocheting with them!

Thanks Lisa for making them for me!
 

Wednesday, April 24, 2013

Crochet Dish Sponge

Here is a crocheted dish sponge:


I found this pattern and thought I would make one to try it.  I have been using it as a sponge for the last five days and I think it will be a nice replacement from the store bought sponges.  I think that I am going to have to get those green scrubby ones only for those tough baked on problem dishes.  I usually soak them overnight if I need to so it may not be an issue at all.
 
It was super easy and quick to crochet with very little yarn.  It'll be a great project for using up leftover scraps of cotton yarn.
 
Supplies:
Yarn: Peaches N' Creme #173 - Spring Meadows
Hook: US G

Monday, April 22, 2013

Luxurious Ribbed Spa Cloth

Here is a new pattern for some dishcloths for my new camper:


I found this pattern on Etsy from Rustic Threads store.  I was looking for a new crocheted dishcloth pattern that has a tight weave.  I think I have found the perfect one!

I used I Love This Cotton yarn from Hobby Lobby.  A store recently opened in my area and I had to buy some of this cotton to try.  I really liked working with it!  Compared to Sugar N' Cream, the ILTC is much softer, does not separate easily and is not as linty.  When I work with SNC, I am constantly rubbing my nose because the lint is everywhere.  I will buy more of this next time I go there!!!

Supplies:
Pattern: Luxurious Ribbed Spa Cloth by Hillery Towle
Yarn: Hobby Lobby's I Love This Cotton #230 - Woods
Hook: US G

Saturday, April 20, 2013

Scrap-A-Long Ruffle Alien

Here is my project for the Scrap-A-Long with the Freshstitches group over on Ravelry.  Meet my ruffled alien:


I made him from a magic ball that I purchased from Freshstitches.  Do you want to make your own magic ball?  Read about it HERE to learn how.  Here is the mostly purple one that I used to make the alien:


It is actually much easier than I thought it would be!  After I purchased this one, I went through my scraps (which wasn't much because I threw most of them away when I organized my craft room closet in November) and made two magic balls for myself.  One is mostly pink:


and the other is mostly green.


I can't wait to use them to make more scrappy amigurumi after I get caught up on my commissioned orders.

Supplies:
Pattern: Ruffle Alien by Stacey Trock from Amigurumi: Design Your Own Monster (Craftsy)
Yarn: Magic Ball from Freshstitches - Mostly Purple
Hook: US G

Thursday, April 18, 2013

Lucinda's Ladybug

Here is Vera the Ladybug:


Here's another view of her:

 
This was another commissioned order from a co-worker whose aunt loves ladybugs!

Supplies:
Pattern: Vera the Ladybug by Stacey Trock
Yarn: Caron One Pound #516 - New Scarlet and Red Heart Super Saver in Black and White
Hook: US G

Tuesday, April 16, 2013

Hubby's Pillowcase with French Seams

Here is a pillowcase that I made for my hubby:


I told him that I was going to use mine in the camper and he wanted one as well.  This was the most masculine fabric that I had in my stash without going shopping.  He said "Boats and lighthouses??"  I told him it was his "vacation" pillowcase!!!
 
While I was searching for fabric for hubby's pillowcase, I was matching up lots more.  I think that I am going to make some to sell in my Etsy store.  I'll let you know!

Friday, April 12, 2013

Blue Nelson

Here is a Nelson owl that was a commissioned project for a co-worker's new nephew:


I think he came out really cute!

Supplies:
Pattern: Amigurumi Nelson the Owl by Stacey Trock from FreshStitches
Yarn: Red Heart Super Saver in Buff, Navy, Light Blue and Black
Hook: US G

Friday, April 5, 2013

My First Swoon Block

In playing around on the internet, I came across the Swoon quilt pattern.  I feel in love with it instantly so I bought the pattern!  I love how one completed block is 24-1/2" x 24-1/2".  So I decided to make one block as a wall hanging for my office.
 
Here are the fabrics that I picked out:

 
For me, the brown fabric is my "grown-up" fabric but the blue is my bright colors that I love so much.  I found this fabric at Meeting House Fabrics in Wales, MA last weekend when they had all their fat quarters buy one get one free.  I was able to find 3 brown, 3 blue and 2 peach.  I am hoping to have enought fabric to add a checkerboard border to it with the brown and blue and binding it in peach.

Stay tuned for the finished product!  I just have to finish my king size brown striped quilt for my bed before I can start another project.

Wednesday, April 3, 2013

Selah's Monkey

Here is Owen the monkey made for a co-worker's granddaughter:
 

When I turned around to get some yarn out for my next project, Owen decided to start crocheting himself:

 
This was my first time making Owen and I really like how he came out!

Supplies:
Patttern: Amigurumi Owen the Monkey by Stacey Trock
Yarn: Red Heart Super Saver Buff, Cafe Latte and Black
Hook: US G

Wednesday, March 27, 2013

Pillow Case with French Seams

My neighbor Denise and I went to Hobby Lobby for the first time on Saturday.  While we were there, we talked to a very nice lady who was also shopping, about a pattern for making pillow cases with french seams.  So Denise bought some fabric there to make some (I have PLENTY of fabric at home) and we went to town.
 
Here is my finished pillow case:


I just used the first fabric that I found that was large enough and grabbed some coordinating pieces to use with it.  I am going to use this pillow case on my pillow in my camper, since it won't match my bed.
 
Here is the link to watch a You Tube video on how to make one: Pillow case video tutorial.  If you would prefer written instructions with pictures, I used this one: Pillow case with french seams written tutorial.  The written instruction also include measurements to make king size pillow cases.  I really like how it came out!
 
After completing future quilts for my bed, I will also buy extra fabric of the quilt backing to make into pillow cases to match the quilt along with matching shams that I already make for it.


Monday, March 25, 2013

Jaden's Yoda

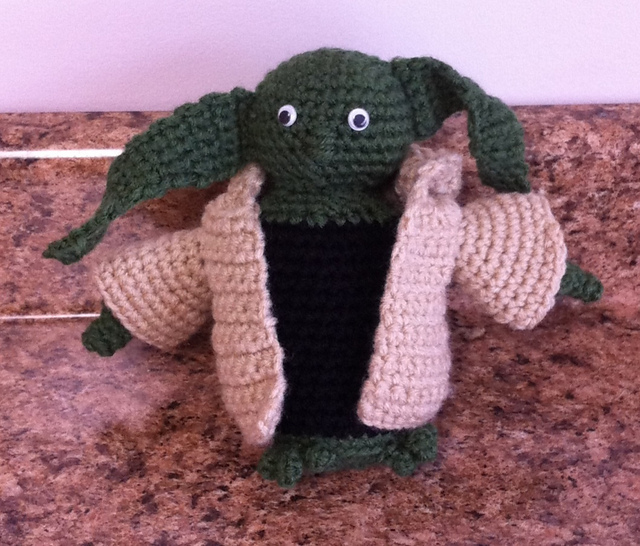
Jaden's birthday is coming up soon.  When I went to his sister's birthday party at the beginning of March, I asked him what he wanted me to make for him.  He requested a teddy bear.  Then his mother suggested anything Star Wars based since he is totally obsessed with it.  It is not his fault, his father is too.  So here's what I made him:
 
 
I am very pleased with how this came out!  The coat is removable too!
  
Supplies:
Pattern: Yoda by Penelope Privett
Yarn: Red Heart Super Saver in Buff, Medium Thyme and Black
Hook: US E

Friday, March 22, 2013

Heidi's Ricky the Kutie Koala

I was asked to make another koala but in a mini version using fingering weight yarn.  Here he is:

 
Here is the mini koala next to a regular size Nelson the Owl for a size comparison:
 
 
He is so tiny and adorable!  I really like how he came out!

Supplies:
Pattern: Ricky the Kutie Koala by Stacey Trock from Cuddly Crochet: Adorable Toys, Hats and More
Yarn: Knit Picks Palette Yarn in Almond, White and Black
Hook: US B

Wednesday, March 20, 2013

Hershey's Chevron Pillow

Here is the chevron log cabin block from the log cabin techniques class that I took this month.  I made into a pillow for my dog, Hershey.  Here it is:


It was a rather small block so I added three more sides to it along with a border to make it big enough to use with the pillow form.  I have this on the living room couch for Hershey to cuddle with.
 
Now I just need to turn those green blocks into pillows for the camper from that class as well.  I think I will do that this week or weekend for sure!

Monday, March 18, 2013

Jitterbug Quilting Class - Class #4

For our last class, we assembled the blocks together with the sashing.  Then we added a background fabric border followed my a keyboard border with the remaining strips of the jelly roll fabric and backgound fabric.
 
Here is the completed quilt top:
 
 
I am planning on quilting it myself.  I am going to stitch in the ditch in between the two rows of sashing going top to bottom and left to right.  Then I will go around both sides of the background fabric border.  Finally, I will outline the diamond shaped centers of each of the twelve blocks.
 
I will post a picture of it completed when I get some quiet time to finish it!

Friday, March 15, 2013

Log Cabin Technique Class

On Saturday, I took our second class for the month of February (which was rescheduled to March thanks to the blizzard from Storm Nemo) from 11 to 4.  It was a log cabin technique class using this ruler:


It uses the book called Log Cabin ABSc by Marti Michell (which I ending up buying after class):


I have made several log cabin quilting using the Quilt in a Day book by Eleanor Burns.  But I love this ruler so much better!  The squares are so precise, accurate and square from the beginning.  I will only use this method from now on when making any quilts using these blocks! 

Here are some of the samples I made from the class:

Chevron Block:


I think that I am going to turn this into a small pillow for my dog, Hershey.  He loves cuddling with pillows on the couch and this one would be his.  I don't have any more orange fabric or I would make more blocks and turn it into something larger.
 
Court House Block:


Traditional Log Cabin Block:


The court house and traditional log cabin blocks are going to be used as the fronts for some toss pillows for our new camper. My camper's colors are mostly brown with a hint of green so these will match perfectly! I love the look and colors in both of these blocks.

Off Centered Log Cabin Block:


For this last block, they are actually four separate blocks joined together as one bigger one forming a pattern.  I made these from 2 fat quarters and I used a little more than half of each one.  I have 4 more of each colored fat quarters at home.  I think I am going to make more of these blocks and see how big it will be to make something out of it.  I am hoping for a lap quilt or at least a wall hanging for my office at work, we'll have to wait and see.

Overall, it was a fun class and I learned a whole lot from it.  And I got to spend the whole day with Denise and Carol as an added benefit!